The short answer
The best mini excavator for starting a business is not one universal brand or model. It is the smallest configuration that can complete the jobs you intend to sell while passing access, working-envelope, digging, lifting, transport, attachment, operator-fit and support checks. Score each point from 0 to 2, but treat any unverified lift, transport, attachment or support requirement as a stop condition. A high total cannot make an incompatible machine suitable.
01
Use the scorecard as a shortlist tool
Start with evidence, not a favorite badge. Caterpillar’s dealer-question checklist begins with the tasks the machine must perform, then asks about turning radius, tracks, attachments, trailer requirements, maintenance and support. Construction Equipment’s current buyer guide similarly tells buyers to determine required dig depth, reach, lift capacity, transport weight and access before shopping. Those are not universal model recommendations; they are the inputs a buyer must define.Cat mini excavator dealer questionsConstruction Equipment buyer guide
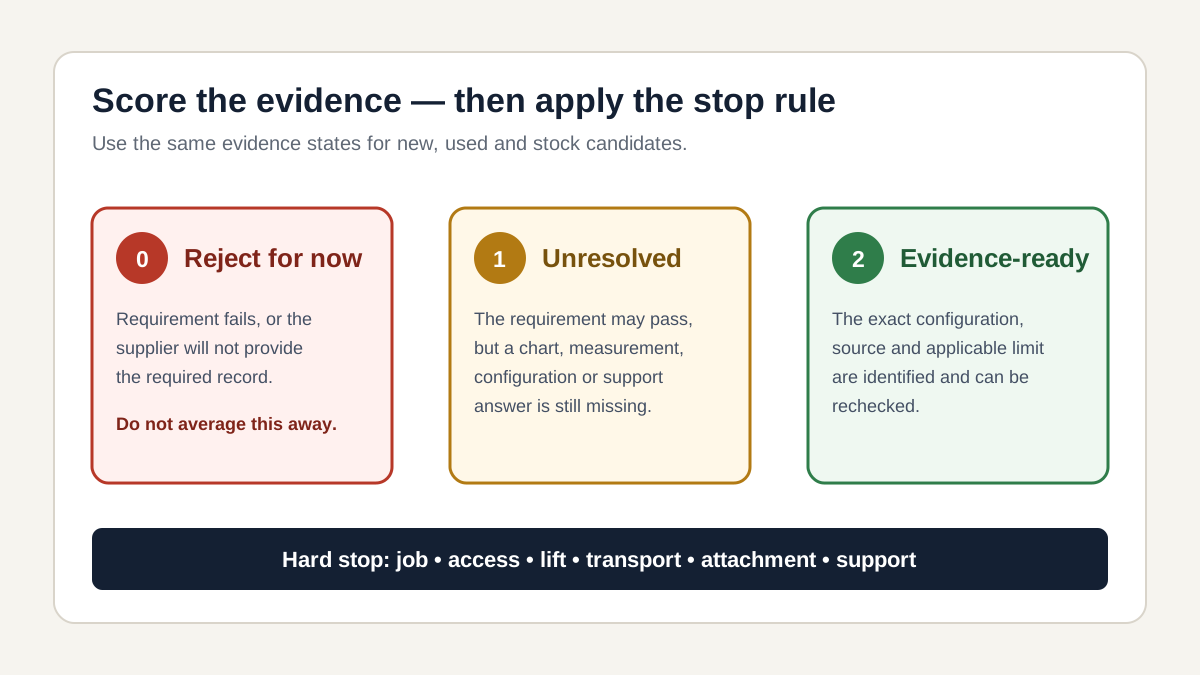
Use 0 when the model fails or the supplier will not provide a required record, 1 when the question remains open, and 2 when the exact configuration is supported. A score of 15–18 creates a shortlist, not a purchase approval. A score of 10–14 means the brief is incomplete. Below 10, stop comparing machines and define the work first.
At every total, a failed hard gate for job fit, access, lift, complete transport, required attachment or minimum support evidence removes that configuration from the shortlist.
| Point | 0 — reject for now | 1 — unresolved | 2 — evidence-ready |
|---|---|---|---|
| 1. Job mix | No defined paid jobs | General idea only | Three named jobs and machine functions |
| 2. Entry access | Unmeasured | Estimated clearance | Minimum route measured with margin |
| 3. Working envelope | Setup space ignored | Rough site sketch | Swing, blade and spoil positions mapped |
| 4. Digging case | “More depth is better” | Maximum depth compared | Depth, reach and grade case recorded |
| 5. Lifting case | One brochure number | Load named, position missing | Load, radius, height and orientation recorded |
| 6. Transport | Machine weight only | Partial truck/trailer check | Complete configuration independently verified |
| 7. Attachment system | Bucket fit assumed | Tools listed | Coupler, weight, hydraulics and controls matched |
| 8. Ground/operator fit | Not tested | General preference | Site and operator trial completed |
| 9. Support/evidence | Seller assurance | Some documents | Parts, manuals, response and exact-unit evidence verified |
A hard stop overrides the total. The scorecard is a screening method, not a safety or suitability certification.
02
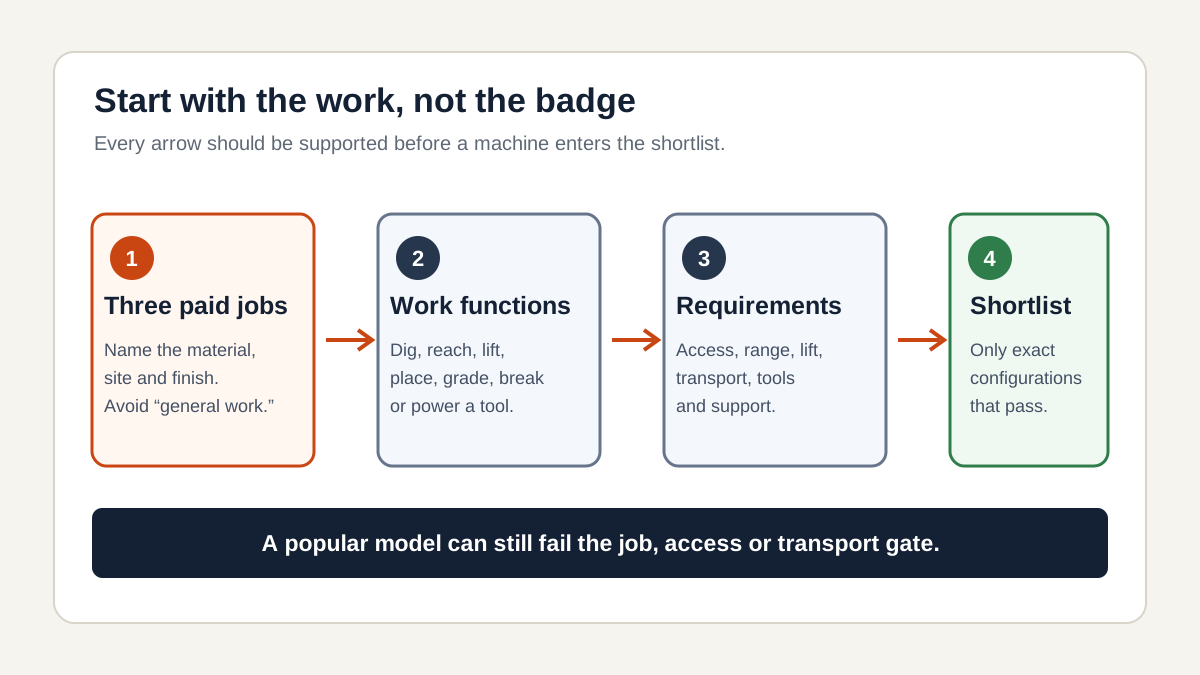
Point 1: Lock three real jobs before looking at models
Write down the three jobs the machine must perform during its first operating phase. Do not write “general excavation.” Name the work: a drainage trench at a known target depth, tight-access footing excavation, stump and root removal, auger work, or another service you have already qualified. For each job, list the functions the machine must deliver: dig, reach, lift, place, hold, grade, break, compact or handle a specific attachment.
This step also tests whether a mini excavator should be the first category at all. If the core work is moving and spreading loose material across open ground, a loader or skid steer may own more of the workflow. If the core work depends on below-grade digging, controlled trenching, lifting from an excavation or working beside obstacles, the excavator case becomes stronger.
Use the existing job-selection guide to define the work before scoring models. This article starts after that decision; it does not repeat service pricing, demand or customer acquisition.Define the first mini excavator job mix
03
Points 2 and 3: Measure access and the working envelope
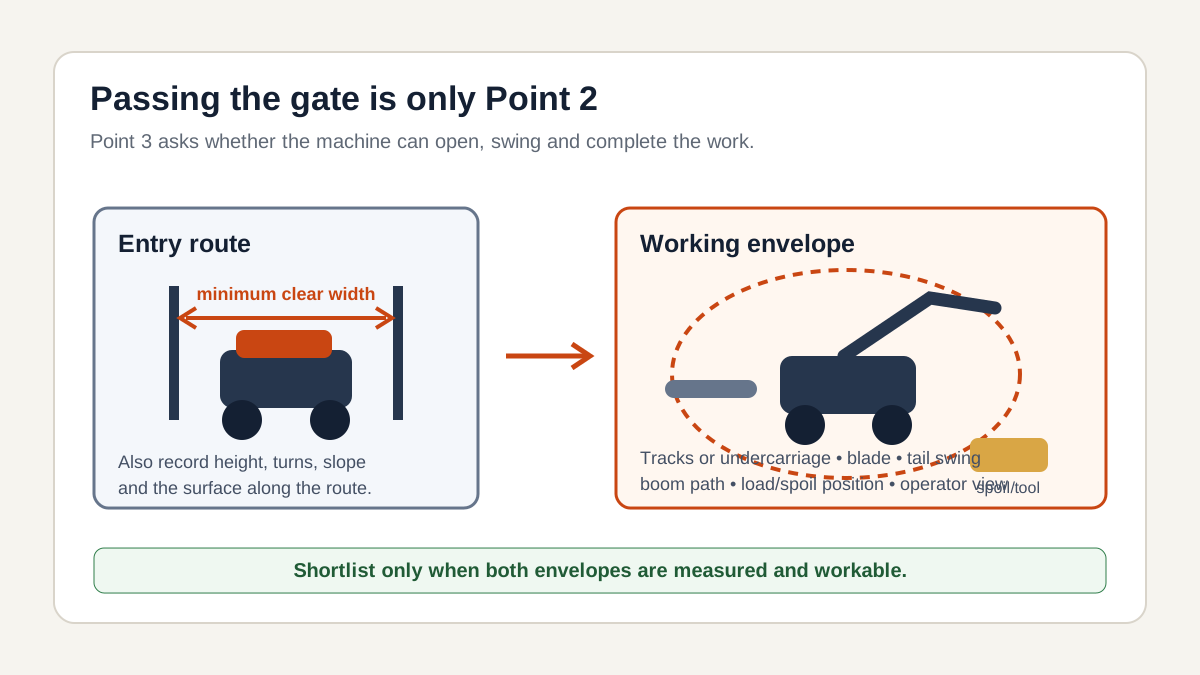
Entry access and working access are different. Measure the narrowest gate, alley, doorway or path, plus overhead clearance, turning points, slopes and surfaces along the approach. Then map the space required to widen a retractable undercarriage when applicable, deploy the blade, rotate the upper structure, swing the boom, position spoil and load a truck or trailer.
Bobcat’s current landscaping and small-construction guide advises buyers to start with access and notes that retractable undercarriages can narrow for entry before widening for stability. Caterpillar’s checklist separately asks for turning radius in tight spaces. The practical lesson is conditional: a compact entry width is useful only if the machine can change into its intended working configuration and still perform the job.Bobcat access-first buyer guideCat turning-radius question
Record four measurements for every recurring site type: minimum entry width, minimum entry height, usable setup rectangle and permitted tail swing. Add the surface and slope conditions as site notes. Do not use “fits through a standard gate” or “zero tail swing” as a substitute for exact model dimensions and a site sketch.
04
Points 4 and 5: Record the dig and lift cases
For digging, record the required depth, reach from the nearest stable setup position, trench or footing width, spoil placement and finish requirement. Maximum dig depth is only one point on a working range. A model that reaches the target at the edge of its geometry may leave little flexibility for grade control, bucket angle or spoil handling.
For lifting, define the load and position together: estimated load mass from a responsible source, load radius, lift height, working over the blade or side, attachment or coupler installed and expected ground condition. Lift capacity varies across those conditions. Use the manufacturer’s lift chart for the exact model and configuration; do not apply one maximum capacity to every radius or orientation.Construction Equipment specification checklistMini-excavator lift-chart selection guide
This article is a selection screen, not a lifting procedure. The operation manual, lift chart, attachment manual, competent operator and job-specific plan control the actual work.
| Work case | Evidence to record | Reject when |
|---|---|---|
| Trench or footing | Depth, reach, width, setup distance and spoil position | Required range is outside the verified work envelope |
| Pipe, chamber or material placement | Load, radius, height, orientation and attachment | Applicable manufacturer chart is missing or the case is outside it |
| Stump, rock or demolition tool | Material, tool, hydraulic demand and handling plan | Tool or machine documentation cannot support the setup |
| Finish or slope work | Required tolerance, visibility, controls and attachment | The operator cannot demonstrate the required control |
05
Point 6: Make transport a hard gate
Transport belongs near the beginning of the shortlist because it can reject an otherwise capable machine. Record the exact operating configuration: machine, cab or canopy, tracks, blade, counterweight, coupler, bucket or tool, thumb, guards, fuel condition and every loose attachment. Then compare that complete shipment with the actual truck, trailer, hitch, axle, tire, brake, securement and route requirements using the responsible ratings and authorities.
Caterpillar’s checklist asks what trailer is needed for the specific model and weight. Construction Equipment likewise treats transport requirements as a core pre-shopping specification. Neither supports guessing from a class label. “Three-ton excavator” is not a transport record, and brochure operating weight may not equal the complete combination you plan to move.Cat trailer questionConstruction Equipment transport criterion
Stop the shortlist when the transport system is still assumed, when the configuration changes after the weight check, or when the responsible carrier, dealer or local professional cannot verify the intended setup. This page does not provide a towing, CDL, axle or route-law threshold; those questions remain with their proper owners.
06
Point 7: Match the attachment system, not just the bucket
An attachment plan must match five layers: mechanical interface, tool mass, required hydraulic flow and pressure, required plumbing, and operator controls. Add return-line or case-drain requirements where the tool manufacturer specifies them. Confirm whether the coupler, thumb, bucket, auger, breaker, compactor or other tool can be used together in the proposed configuration.
Attachment variety can make a mini excavator more useful, but a long wish list is not a buying reason. Start with the tools tied to the three jobs in Point 1. For each tool, collect its manual or data sheet and compare it with the exact machine’s approved auxiliary circuits and attachment limits. “The pins fit” does not prove that the hydraulics, controls, stability or carrier rating fit.Bobcat attachment-led selection guideConstruction Equipment attachment checklist
When comparing new machines, ask for the proposed coupler, circuits, controls and tools as one configuration. When comparing used machines, verify what is actually installed rather than assuming the machine still matches its original specification.Compare new mini excavator configurationsCompare used mini excavator categories
07
Point 8: Test ground, tail swing and operator fit
Ground conditions affect traction, disturbance, stability and the attachments needed for the work. Tail-swing design changes how the operator positions the machine beside walls, traffic, landscaping and spoil. Neither conventional nor reduced or zero tail swing is universally best: the correct choice depends on the space, counterweight, lift case and machine configuration.
Put the intended operator in the candidate. Check entry and exit, visibility to the bucket and track edges, control pattern, pedal reach, display clarity, seat and armrest adjustment, attachment controls and daily service access. Caterpillar’s current ownership guide describes the machine as both a tool carrier and an operator workplace; Construction Equipment tells buyers to open service panels and inspect access to daily maintenance points.Cat mini excavator ownership guideConstruction Equipment service-access checklist
A short demonstration cannot prove long-term reliability, but it can reject poor visibility, awkward controls, inaccessible service points or a setup that cannot reproduce the planned work case. Record what was tested, which attachment was installed and what remained untested.
08
Point 9: Verify support and the exact machine evidence
Support is local and configuration-specific. Ask who supplies model- and serial-specific parts, manuals, diagnostics, training and service. Request a real response path and identify which items are stocked, ordered or unsupported in the machine’s operating region. Do not award a point because a brand is popular somewhere else.
For a new machine, verify the exact model and serial or configuration record, standard and optional equipment, manuals, parts path, commissioning or handover scope, stated warranty document and attachment approvals. For a used machine, add identity, meter or ECM where available, service and repair history, cold and warm working evidence, undercarriage measurements, leaks or faults and independent inspection access. A repaint, broad “fully serviced” statement or distant operating video does not close those fields.
The stock pages can supply candidate units, but each listing still needs to pass the same job and evidence score. A used-machine shortlist carries more condition-history questions; a new-machine shortlist carries more configuration, documentation and support-confirmation questions. Neither path receives an automatic score.Review current excavator stock
09
Apply the score without letting the total hide a stop condition
Score each point only after evidence exists. Use 0 when the model fails or the seller or supplier will not provide a required record, 1 when the question is still open, and 2 when the exact configuration is supported. Keep a separate stop column. If a machine fails the paid jobs, access, lift case, complete transport system, required attachment or minimum support evidence, remove it even when the total looks strong.
Direct Excavator can compare the same brief against new mini excavator options, used mini excavator categories and relevant stock. Send the completed requirement brief rather than asking for the “best model” without the work and evidence behind it.Open new mini excavator optionsOpen used mini excavator optionsSend the requirement brief
| Brief field | What to provide |
|---|---|
| Three target jobs | Material, depth/reach/lift case, site type and finish requirement |
| Access and work envelope | Route width/height, setup rectangle, tail-swing boundary, slope and surface |
| Dig and lift cases | Exact positions and required manufacturer charts |
| Transport configuration | Machine and every installed or loose item, plus verified transport constraints |
| Attachment system | Coupler, tool mass, flow/pressure, plumbing and controls |
| Operator and support | Operator requirements, manuals, parts, diagnostics, service and training path |
| Machine evidence | New configuration record or used identity, history, condition and inspection file |
10
Related equipment
Related equipment
Compare the scorecard with the correct machine condition path, then verify the exact configuration and evidence.
Used Kubota U35 Mini Excavator
Kubota U35 mini excavators for sale from China, with tight-access working range, year and hours guidance, inspection proof, and container shipping support.
Used Bobcat E35 Mini Excavator
Bobcat E35 mini excavators for sale from China, compact machines for tight-access jobs, with year and hours guidance, inspection proof, and shipping support.
11